Begin with the Soil
Soils of Central Oregon
Soils here are sandy, coarse, high in pumice, and low in humus. Acidity runs between 5.5 and 8 on the pH scale; the closer to pine forests, the more acidic. The closer to the Sagebrush steppe the more alkaline. Most of the soils lack nitrogen, sulfur and selenium. The water holding capacity is low, but the drainage and aeration are good. The soils are loose and friable. When the soil is enriched to become a good sandy loam, it is easy to work and a joy to weed.
Soil Fertility
Testing your soil can be a helpful in determining just what it is lacking and to give you some guidelines to improving it. Simple testing kits are available at garden stores and mail order garden supply catalogs. These tests will tell you the pH and the NPK (nitrogen, phosphorus and potassium). If you want more extensive information you will need to locate a soil lab, and it is fairly costly. One company that does these tests is Peaceful Valley Farm Supply, P.O. Box 2209, Grass Valley, CA, 95945. Their number is (916) 272-4769.
The pH of the soil technically has to do with hydrogen atoms, but for our purposes it is a gauge of the acidity and alkalinity of the soil. The pH scale runs from 0 to 14, with 7 being neutral. Most garden plants prefer a slightly acidic soil of 6.5 to 6.8. This is, however, variable. An acid soil of about 4.5 to 5.5 is needed by rhododendrons and blueberries. Alfalfa likes a pH of about 7.
Organic matter in the form of humus will correct either high or low pH. That is why gardeners using natural matereials get such good results; regardless of what is wrong, humus matter will correct it.
The following are ways to add humus:
- Mulch with hay or straw and then work the mulch into the soil after the crops are harvested.
- Cover crops turned under into the soil.
- Sheet compost with manure and other residues and work into the soil.
- Make compost and work it into the soil.
If your soil needs more immediate attention there are soil additives are available. For soil that is too acidic; limestone, particularly dolomite lime is used. It can be added anytime, and worked into the soil or you can add it to your compost. Start with 1/2 pound per ten square feet, work it in and test again. A lime application usually lasts about three years.
Lowering the alkalinity is best done by adding organic matter. Sulphur can be added if you need a quick change. One pound of sulphur per 100 square feet will reduce the pH by one point. Dig the sulphur in before planting, and keep the soil moist during the growing season. It is recommended that you leach the soil well with water after two or three months.
NPK, nitrogen, phosphorus and potassium, are the nutrients that are used in the largest quantity by growing plants. These are the only nutrients that are added by artificial fertilizers and are what the three numbers on the fertilizer packages stand for: 10-10-10, for example represent nitrogen, phosphorous and potassium in that order.
Nitrogen is a major element in plant nutrition, responsible for producing leaf growth and greening, among other things. Plants with yellow leaves and stunted growth, probably need nitrogen. Organic sources of nitrogen are: manure (chicken has the highest level), compost, blood meal, cotton seed meal and legume cover crops.
Phosphorous is important for strong root growth, brighter, more beautiful flowers and good growth in general. Plants lacking this element show small, thin, purplish, stunted growth and have sterile seeds. Organic supplements include rock phosphate, bone meal, cottonseed meal, and cover cropping with sweet clover and alfalfa.
Lack of potassium shows up as browning leaves, slow, stunted growth and fruit. Potassium is important for strength, as it carries carbohydrates throughout the plant. It helps form strong stems, aids in productions of other nutrients and increases resistance in general. Supplements include plant residues, manures, compost, granite dust, greensand and basalt rock.
Trace minerals of all kinds are also needed by growing plants. Minerals can be increased by kelp and seaweed products, plant residues, particularly from sources outside the local area, and by cover crops such as rye and alfalfa whose roots go deep into the subsoil to pump up nutrients.
Compost
Composting is the process of decay of organic matter which is going on everywhere in nature. Leaves and forest debris fall to the ground, animal droppings, dead weeds and grasses are added and all turn to compost. This is the process that returns organic debris to the soil. The compost pile is an intensified version of this process.
Composting is accomplished by billions of soil creatures that use the raw materials for their development. Some of these creatures, such as the earthworm, are easily seen, many billions more are microscopic and only the results of their existence is obvious to the naked eye. This decay process renders the nutrients easily assimilable to the plants. The gardener’s goal should be to feed the soil, and the soil will feed the plants.
Why Should we Compost?
A good reason to compost is the increasing amount of garbage that is a becoming a major problem in crowded landfills. It is estimated that 20 to 30 percent of all trash consists of kitchen scrapes and garden refuse. Anything that can be done to reduce this problem is well worth the effort.
Another good reason is to obtain valuable fertilizer for gardens, lawns, flower beds and house plants. There is no better fertilizer and soil conditioner than compost.
There are a number of ways to handle composting. Your choice will depend upon your time, the amount and kind of available organic matter and how large of a garden space you have.
There are several methods that do not require as much space as a pile or heap. Sheet composting is when the organic matter is spread over the garden. Trenching is when the organic matter is buried in the soil. Earthworm cultivation is another method used to turn waste into rich fertilizer.
What to Compost
The materials most commonly used are hay, straw, barnyard and chicken yard litter, garden refuse in the form of dead plant parts and weeds. Any waste litter from the garden should be composted. Diseased plants should be placed in the middle of the heap so the heat can destroy the disease organisms.
Kitchen wastes, in the form of peelings, cores, egg shells, coffee and tea grounds are good additives. Hair clippings from people and pets are high in nitrogen and can be used. Meats and bones in theory can be used, but it is best to avoid anything in the compost that will attract dogs or other animals.
Young green plants are particularly useful. As many as possible should be allowed to grow for that purpose. Some people even grow plots of plants such as alfalfa just to harvest for compost. Troublesome weeds such as tumbleweed and mustards can be used also, and are best when young and succulent. The perennial grasses can be difficult to get to break down, the roots are tough and resistant.
The nitrogen for a compost pile is usually in the form of manures. Any barnyard manure is good: cow, horse, chicken, rabbit, llama and others. Dog and cat manures are not recommended because disease organisms may be present which are transmittable to humans. In theory the heat will destroy these, but it is best not to take the chance. If manure is not available, a high nitrogen substitute can be used such as blood meal.
Leaves, pine needles and sawdust can be composted, but are slow to break down and it helps to mix them with other materials, such as green weeds, to facilitate their breakdown. If leaf mould is desired, hardwood leaves are used for the compost. This is slower to break down than the regular compost pile, as leaves are slow to compost.
Look around your neighborhood to see what agricultural and industrial waste products are available. Some examples are wood product wastes, mint left after the oil is removed, and wastes from canneries. These products are often available in bulk and are cheap or free.
Hot Composting
Hot composting is the method most people think about when we say compost. A pile is stacked in sandwich layers with correct carbon to nitrogen ratio to enable the materials to generate enough heat to break down the debris. It is the most efficient method available to the average home gardener.
The hot compost method is a good way to handle large quantities of materials that are unpleasant to handle, such as fresh manure or garbage. After composting, these become a pleasant-to-handle fertilizer. Hot composting will also increase the nitrogen content of low-nitrogen organic materials such as straw or sawdust. Microorganisms digest much of the carbon and though reduced in bulk, the pile’s nitrogen content is increased. Another real advantage to the hot compost heap is that it kills weed seeds and disease-causing organisms.
The most common technique is the Indore Method, and was laid out by an English agricultural scientist, Sir Albert Howard, while he worked in India. The materials are stacked in sandwich fashion to ensure the correct ratio of carbon to nitrogen and also to distribute the materials evenly throughout the pile. The work is then done by thermophilic (heat-loving and heat-generating) and aerobic (air-loving) microorganisms.
The ingredients can include kinds of organic matter: hay, straw, leaves, grass clippings, weeds, kitchen scraps of vegetable parings, coffee grounds and egg shells, or anything you have available. Manures are used for their nitrogen content or a high nitrogen fertilizer, such as blood meal can be substituted if there is a shortage of manure. The ratio of 30 parts of carbon to one part of nitrogen is the ideal combination for rapid decomposition. It takes a great deal of organic matter to build this pile, you may have to save up your materials to get enough.
The decomposition takes place by the action of soil microorganisms, primarily thermophilic, aerobic bacteria and fungi. The requirements of these creatures, besides food, are oxygen and moisture. You will need to keep a hose handy while making the pile and wet each layer to the consistency of a wrung-out sponge.
Oxygen can be provided by building the pile around pipes and then removing them when the pile is complete, leaving holes through the pile. Other methods consist of some kind of vertical ventilator pipe, such as plastic pipe with holes, or tubes of wire netting built into the pile. Be careful that the pile is not tightly packed.
The smaller the particles, the faster the decomposition. A shredder or lawn mower can be used to chop the materials to speed up the composting process.
The pile should be about five feet square and five feet deep; it needs to be a minimum of one cubic yard for the heat to generate properly. It is built in sandwich fashion, as follows:
- A layer of brush, such as tree prunings, is put directly on the ground. This is to keep the pile from compacting to the earth, as it needs oxygen circulation.
- Next layer is a six inch layer of green matter, weeds, crop wastes or kitchen scraps.
- Add a two inch layer of manure, or one inch if it is chicken. This can be replaced by using a thin layer of blood meal.
- Sprinkle on a 1/8 inch layer of top soil or old compost to act as an inoculant for the microorganisms. This is also the layer for any special additives such as lime to be added.
- Repeat these layers until the pile is about five feet high.
The pile should then be covered with a layer of hay or sheet plastic. This will help conserve moisture in the heat or minimize leaching of the nutrients in the rain.
The pile will quickly heat up to 150 degrees and begin to shrink in size to about three and a half feet high. Turn the pile over, putting the outside material into the middle, in three weeks and again at six weeks, moistening if necessary. The pile will be ready to use in about three months.
One of the signs of a properly made compost pile is a fast temperature rise, and it should maintain the heat for two weeks or more. This heat should kill weed seeds and disease organisms. A good compost heap should be almost odorless—if the odor is strong, you are using too much nitrogen. Cut down the amount of manure next time. If the odor is a real problem, you can take the pile apart and restack it with more carbonous material.
I have found if I turn my pile only once or even not at all, I still end up with usable compost. It just takes longer and is not of as fine of quality.
The compost from a hot composting process is excellent for the soil, adding humus and organic matter, feeding the worms and other soil organisms. It is a good source of nitrogen, phosphorous and potash, as well as many other necessary nutrients. It really can’t be beat.
Two Week Compost
If you want compost in a hurry and have the time and energy, you can create compost in two weeks. You will need to chop all of the ingredients to small pieces; using a shredder is easiest. Make the layered pile in the same way as hot compost, turn it every two days for two weeks. At which time you have usable compost.
Compost Containers
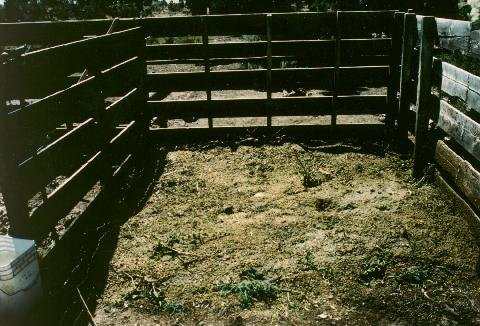
Compost can be made flat on the ground, with no retaining sides at all. I have done it, and it works fine. It is more efficient, however, if you have a bin or container of some sort. The kind I like and use are bins with slated sides. They contain the compost, let air in the sides and can be built out of recycled lumber (old pallets work well).
Wire cages also work well and they have the advantage of being easy to move. If you have close neighbors, you might want to try composting in a pit in the ground, although this is hard to turn.
There are many commercial options available to choose from. Most are some form of closed container that can be rotated to mix the ingredients. These are particularly good options in close neighborhoods where compost piles might be a nuisance. In cities that have rat problems closed containers are the only way to go. It is recommended that you add manure or a high nitrogen fertilizer every time you add carbonous wastes.
Anaerobic composting takes place without oxygen present. This is done in a closed container or the pile itself is covered tightly with plastic. This method conserves the highest nutrient content of all the composting methods.
How to Use Compost
The biggest problem with using compost is that there is never enough. It can be used along with other fertilizing materials, such as manures and commercial fertilizers such as bone meal, cottonseed meal and blood meal. It can be used at any time during the growing season, whenever it is ready, but compost is most effective in the spring and during the growing season.
Compost can be used directly on the garden, spreading it as you would manure, an inch to three inches thick and then work it into the soil. A more economical use is to spread it around (called top dressing) the individual plants, scratching it into the surface of the soil or using it as a mulch. You can also work it into the soil around plants being transplanted.
It is excellent for using in potting soil for container plants. Sift it through a screen, like hardware wire, to get the material fine enough. The rough compost that is left over is a good mulch.
Compost tea can be made by filling a bucket or barrel one half full of compost and covering it with water. In a week or two, strain the liquid and dilute it to the color of tea. This liquid is used as a booster fertilizer for all growing plants, indoor and outdoor.
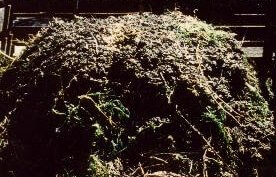
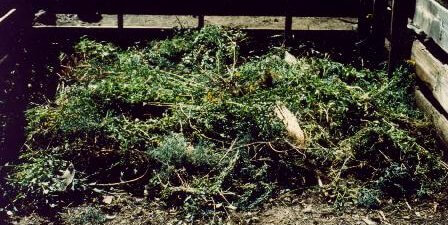
The Refuse Heap
Mesophilic (mild-temperature) and cryophilic (low-temperature) microorganisms can also be used to decompose wastes. It is not as fast a process, because the cooler the temperature the slower the breakdown. This method is much less work-intensive and time consuming than hot composting, and is useful when just small amounts of organic matter are available at a time.
The refuse heap is a simple heap of garden, yard and kitchen refuse piled in an out-of-the-way place. It is added to as the refuse accumulates, with no particular order to the placement of organic materials. It does take a long time to decompose, from one to three years, depending upon the materials used.
This is the least efficient method for nutrient conservation, however. The resulting compost will be an excellent soil texturizer and good for the garden soil, but it will not be a high nutrient fertilizer, and will need to be supplemented with other fertilizers.
Trenching
Trenching is the process of digging holes or trenches in the soil and burying the materials. This is usually used for kitchen wastes, not being practical for large amounts of garden wastes. It is a good way to dispose of your kitchen garbage if you have problems with marauding animals that raid the compost heap.
Trenching can be done any time of year. During the growing season holes can be dug between rows and between plants, burying the garbage six inches or deeper. The garbage may be blended in a blender with a small amount of water to facilitate easier burying and quicker breakdown. In the winter, when the ground is frozen, the garbage can be stored in plastic buckets with tight-fitting lids and saved until spring. It will get slurry and smelly, but this is only anaerobic composting taking place.
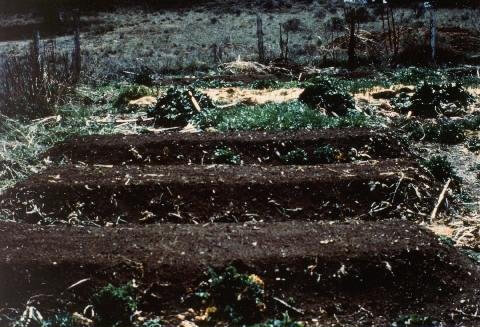
Sheet Composting
Sheet composting is simply covering the ground with organic matter and letting the soil organisms work on it right in place. Farmers use this method to work organic matter into large areas of ground. Often the organic matter is grown in place in the form of cover crops. Small gardeners can make good use of this technique also.
Mulching, both the seasonal variety and permanent mulches, are a form of sheet composting. Some gardeners cover their winter garden with a blanket of leaves, and this is another form of sheet composting. This is a good way to keep steadily building richer soil.
Sheet composting can be used to bring a new piece of ground into production. Cover the area with a thick layer of hay, straw or whatever material you have, lay it right over the weeds and grasses. Pile it at least a foot thick, adding more as the material breaks down throughout the season, add more. This will kill the weeds and produce a soft, friable soil. Potatoes can be grown under the mulch in the above ground method, and the ground put into production the first year.
Green Manure
Crops grown for the purpose of turning into the soil to improve the texture and to build up organic matter is called green manuring. This method is not used enough by home gardeners. It is one of the best soil conditioners ever discovered. The cost is low, it takes little time and the results are excellent.
Cover crops can be used before or after the main crop, spring, summer or fall. If the garden is large enough, use it as a rotating crop, or interplant between row crops. The main crop should be planted a short time (two or three weeks) after turning the cover crop under to take advantage of the nutrients given off by the decaying plant matter. In sandy soil, leave the plant debris near the top; with clay soil, dig it in deeper.
Some of the plants that work well for cover crops are:
- Weeds: These can be turned under where they grow and make and excellent green manure.
- Alfalfa: Being a legume, which fixes nitrogen, alfalfa is particularly good. It is also deep rooted which breaks up subsoils and brings up nutrients and trace minerals. It is a good spring and summer crop, and makes an excellent rotation crop. However, if the plants get too large, it can be difficult to dig under.
- Red clover: This is also a legume, and a nitrogen fixer that is a good spring crop. It can also be planted in mid-summer and left to winter over before digging it in.
- Rye, annual: This is a good winter crop, and can be seeded from late August to October. It has a large root system and brings up potassium from the subsoil.
- Wheat: Also a good winter crop, it brings up potassium. Do not let the crops get too large, or it will be difficult to turn under. If it does get to tall, it may be helpful to mow it first.
Manure
Animal manures are one of the most readily available and inexpensive forms of organic matter. They have been basic for centuries, and are still one of the best soil conditioners. Any of the barnyard manures are excellent–use whatever is available. The biggest problem with manure are the weed seeds that pass through the animal, hence the value of composting. Avoid cat or dog manures, as these can contain organisms that are transmittable to humans.
Broadcast application is usual; spread it on the soil and dig or rototill it in. If the manure is fresh, do this at least eight weeks before planting time. Less time is needed for well aged manure.
Apply the manure three to five inches thick. Chicken manure can be spread thinner, because it has a higher nitrogen content. To be more precise:
- Barnyard manure (cow or horse) – 75 to 100# per 100 sq. feet
- Poultry manure – 35 to 50# per 100 sq. feet
If you do not have these quantities available, a small amount is better than none. It acts as an inoculant by adding microorganisms, and activates and stimulates the soil bacteria.
Commercial Fertilizers
There are quite a number of organic fertilizers commercially available. They provide little humus and are only a supplement, but can give your soil an added boost.
- Dried blood and blood meal: These are sources of readily available nitrogen. They should be used sparingly, no more that 3# per 100 sq. feet. They are between 12 and 15% nitrogen, 3% phosphorus, and up to 7% potassium.
- Bonemeal: A good source of phosphorous, and is particularly good for flowering bulbs. It raises the pH of the soil slightly. It is about 3% nitrogen, 20% phosphorous, and 24 to 30% calcium. The recommended usage is 5# per 100 sq. feet.
- Cottonseed meal: This will help acidify the soil, and contains 5% nitrogen, 3% phosphorus, and 2% potassium. Recommended usage is 5# per 100 sq. feet, for trees apply 2 to 4 cups for every inch of trunk size around the drip line.
- Kelp meal: This contains natural growth hormones, so it must be used sparingly, no more than 1# per 100 sq. feet. It is 1% nitrogen, 12% potassium and 33% trace minerals, including more than 1% of calcium, chlorine and sulfur and about 50 other trace minerals.
There are other additives available such as fish meals, leather meals and soybean meals. There are also mineral supplements such as rock phosphate and greensand that many authorities recommend. The use of these depends on their availability and the needs of the soil.